Paleo Chocolate Chunk Cookies

If you’re baking for Christmas this week, Paleo Chocolate Chunk Cookies are one of my family’s favorite sweet treats! They’re free of grains, gluten, dairy and refined sugar. But still so full of flavor and delicious chocolatey goodness. My whole family LOVES them.

I’m really sensitive to sugar and if I eat it on an empty stomach I have a sugar headache in less than five minutes (a sign of the havoc its creating on my blood sugar levels & endocrine system). So when I bake sweet treats I use healthful sweeteners like raw honey, pure maple syrup or coconut palm sugar, and I like to balance the sugar with protein from nuts, nut flours, nut butters or my favorite plant based protein powder, to reduce the glycemic impact. Enjoying sweet treats (in moderation) AFTER a healthy meal rather than on an empty stomach also helps to reduce the disruption to our endocrine system.

Paleo Chocolate Chunk Cookies

If you’re hosting or attending holiday celebrations this month, you don’t have to eat perfectly. But I highly recommend making or taking a healthy dish or two that you can enjoy and fill up on completely guilt free. I also always take a sweet treat I can enjoy, and these Paleo Chocolate Chunk Cookies fit the bill. You won’t feel the slightest bit deprived or tempted by all of those holiday treats with health harming ingredients!

Heart Healthy Roasted Beet & Arugula Salad

I love to add a big dose of nutrition to my day by having a big green salad for lunch. We also have a green salad with our dinner nearly every single night. Usually its simple — lettuce or greens, maybe with some tomatoes. But sometimes I like to do something different and this salad is the perfect start to a special dinner. 

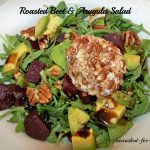
This is my copy cat version of Biaggi’s Honey Roasted Beet &.Arugula Salad, which is one of my favorite things to order there. (By the way, gluten free friends, Biaggi’s has a really good gluten free menu!) The avocado and goat cheese add just the right amount of healthy fats and creaminess to balance out the peppery arugula and the sweetness of the beets and crunch of the pecans rounds it out perfectly. And every single thing in it is so good for you!

Arugula

Arugula is a cruciferous vegetable in the same family as broccoli, Brussels sprouts and kale. Like all cruciferous vegetables, arugula is a nutritional powerhouse. Two cups of arugula  provides 20 percent of vitamin A, over 50 percent of vitamin K, and 8 percent of vitamin C, folate and calcium needs for the day. 

Along with other leafy greens (and beets!), arugula contains very high levels of naturally occurring nitrates (more than 250 milligrams/100 grams), which the body converts to nitric oxide. Nitric oxide is the natural blood pressure medication produced by the body’s own internal pharmacy when we eat right and exercise. Nitric oxid helps to relax and dilate your blood vessels which improves blood flow, muscle oxygenation and athletic performance and lowers blood pressure. 

Eating large amounts of cruciferous vegetables has long been associated with a lower risk of cancer, in part because they contain a sulfur-containing compound  called sulforaphane. These compounds give arugula its peppery bite and may also give it its cancer-fighting power. Researchers have found that sulforaphane can inhibit the enzyme histone deacetylase (HDAC), known to be involved in the progression of cancer cells. The ability to stop HDAC enzymes makes foods containing sulforaphane a powerful part of cancer prevention and could make them an important part of a holistic cancer treatment plan as well.  

Beets

Beets are high in fiber, vitamin C, folate and essential minerals like potassium (essential for healthy nerve and muscle function) and manganese (which is good for your bones, liver, kidneys, and pancreas). 

Like arugula, beets help improve circulation and lower blood pressure due to their naturally occurring nitrates. As discussed above, these nitrates are converted into nitric oxide–a natural vasodilator. 

Beets are also a good source of betaine, a nutrient that helps protects cells from environmental stress. It’s known to help fight inflammation, protect internal organs, improve risk factors for cardiovascular disease and enhance athletic performance.

According to Dr. Mercola, the powerful phytonutrients that give beets their deep color may also help to protect against cancer. Research has found that beetroot extract administered in drinking water reduced multi-organ tumor formations in various animal models. Beetroot extract is also being studied for use in treating human pancreatic, breast, and prostate cancer.

Roasting & peeling beets is easy. Just follow these instructions from thekitchn.com. Roast a bunch of beets at a time. They will keep in the refrigerator for a week, and you can use them for your salads for lunch or dinner throughout the week. Make sure you save your beet greens for another use. Beet greens and raw beets are also great additions to your morning green smoothie. 

Avocado

Avocados are one of my favorite foods. They are high in fiber and vitamins A, C,  K, B6, folate and choline. They have more potassium than a banana (!!) and also contain the minerals calcium, magnesium, phosphorus, copper, manganese and selenium. They are high in heart healthy monounsaturated fat, which actually promotes weight loss. Oleic acid, the main type of fatty acid in avocados, has been shown to reduce inflammation and have beneficial effects on genes linked to cancer. Adding healthy fats like avocado, pecans and extra virgin olive oil to a salad promotes satiety, and when you feel satisfied you’re less likely to overeat or reach for a junk food snack later. 

Just reading all of this makes me want to eat this salad every single day. Nourishing your body has never tasted so good!

Dress the salad with a drizzle of good quality Extra Virgin Olive Oil and a really good balsamic vinegar, if you have one. If you just have every day grocery store variety balsamic, that’s fine too. Make a simple balsamic reduction and keep it in the refrigerator to use all week and longer. It is delicious on salads or drizzled on roasted vegetables.

This salad is perfect for a satisfying and health promoting lunch, a light dinner or as a side or starter for a special occasion. I love it with gluten free Jovial spaghetti and Cousin Claudio’s Authentic Italian Pasta Sauce.

Blessings! 

Kristi 

Roasted Beet & Arugula Salad

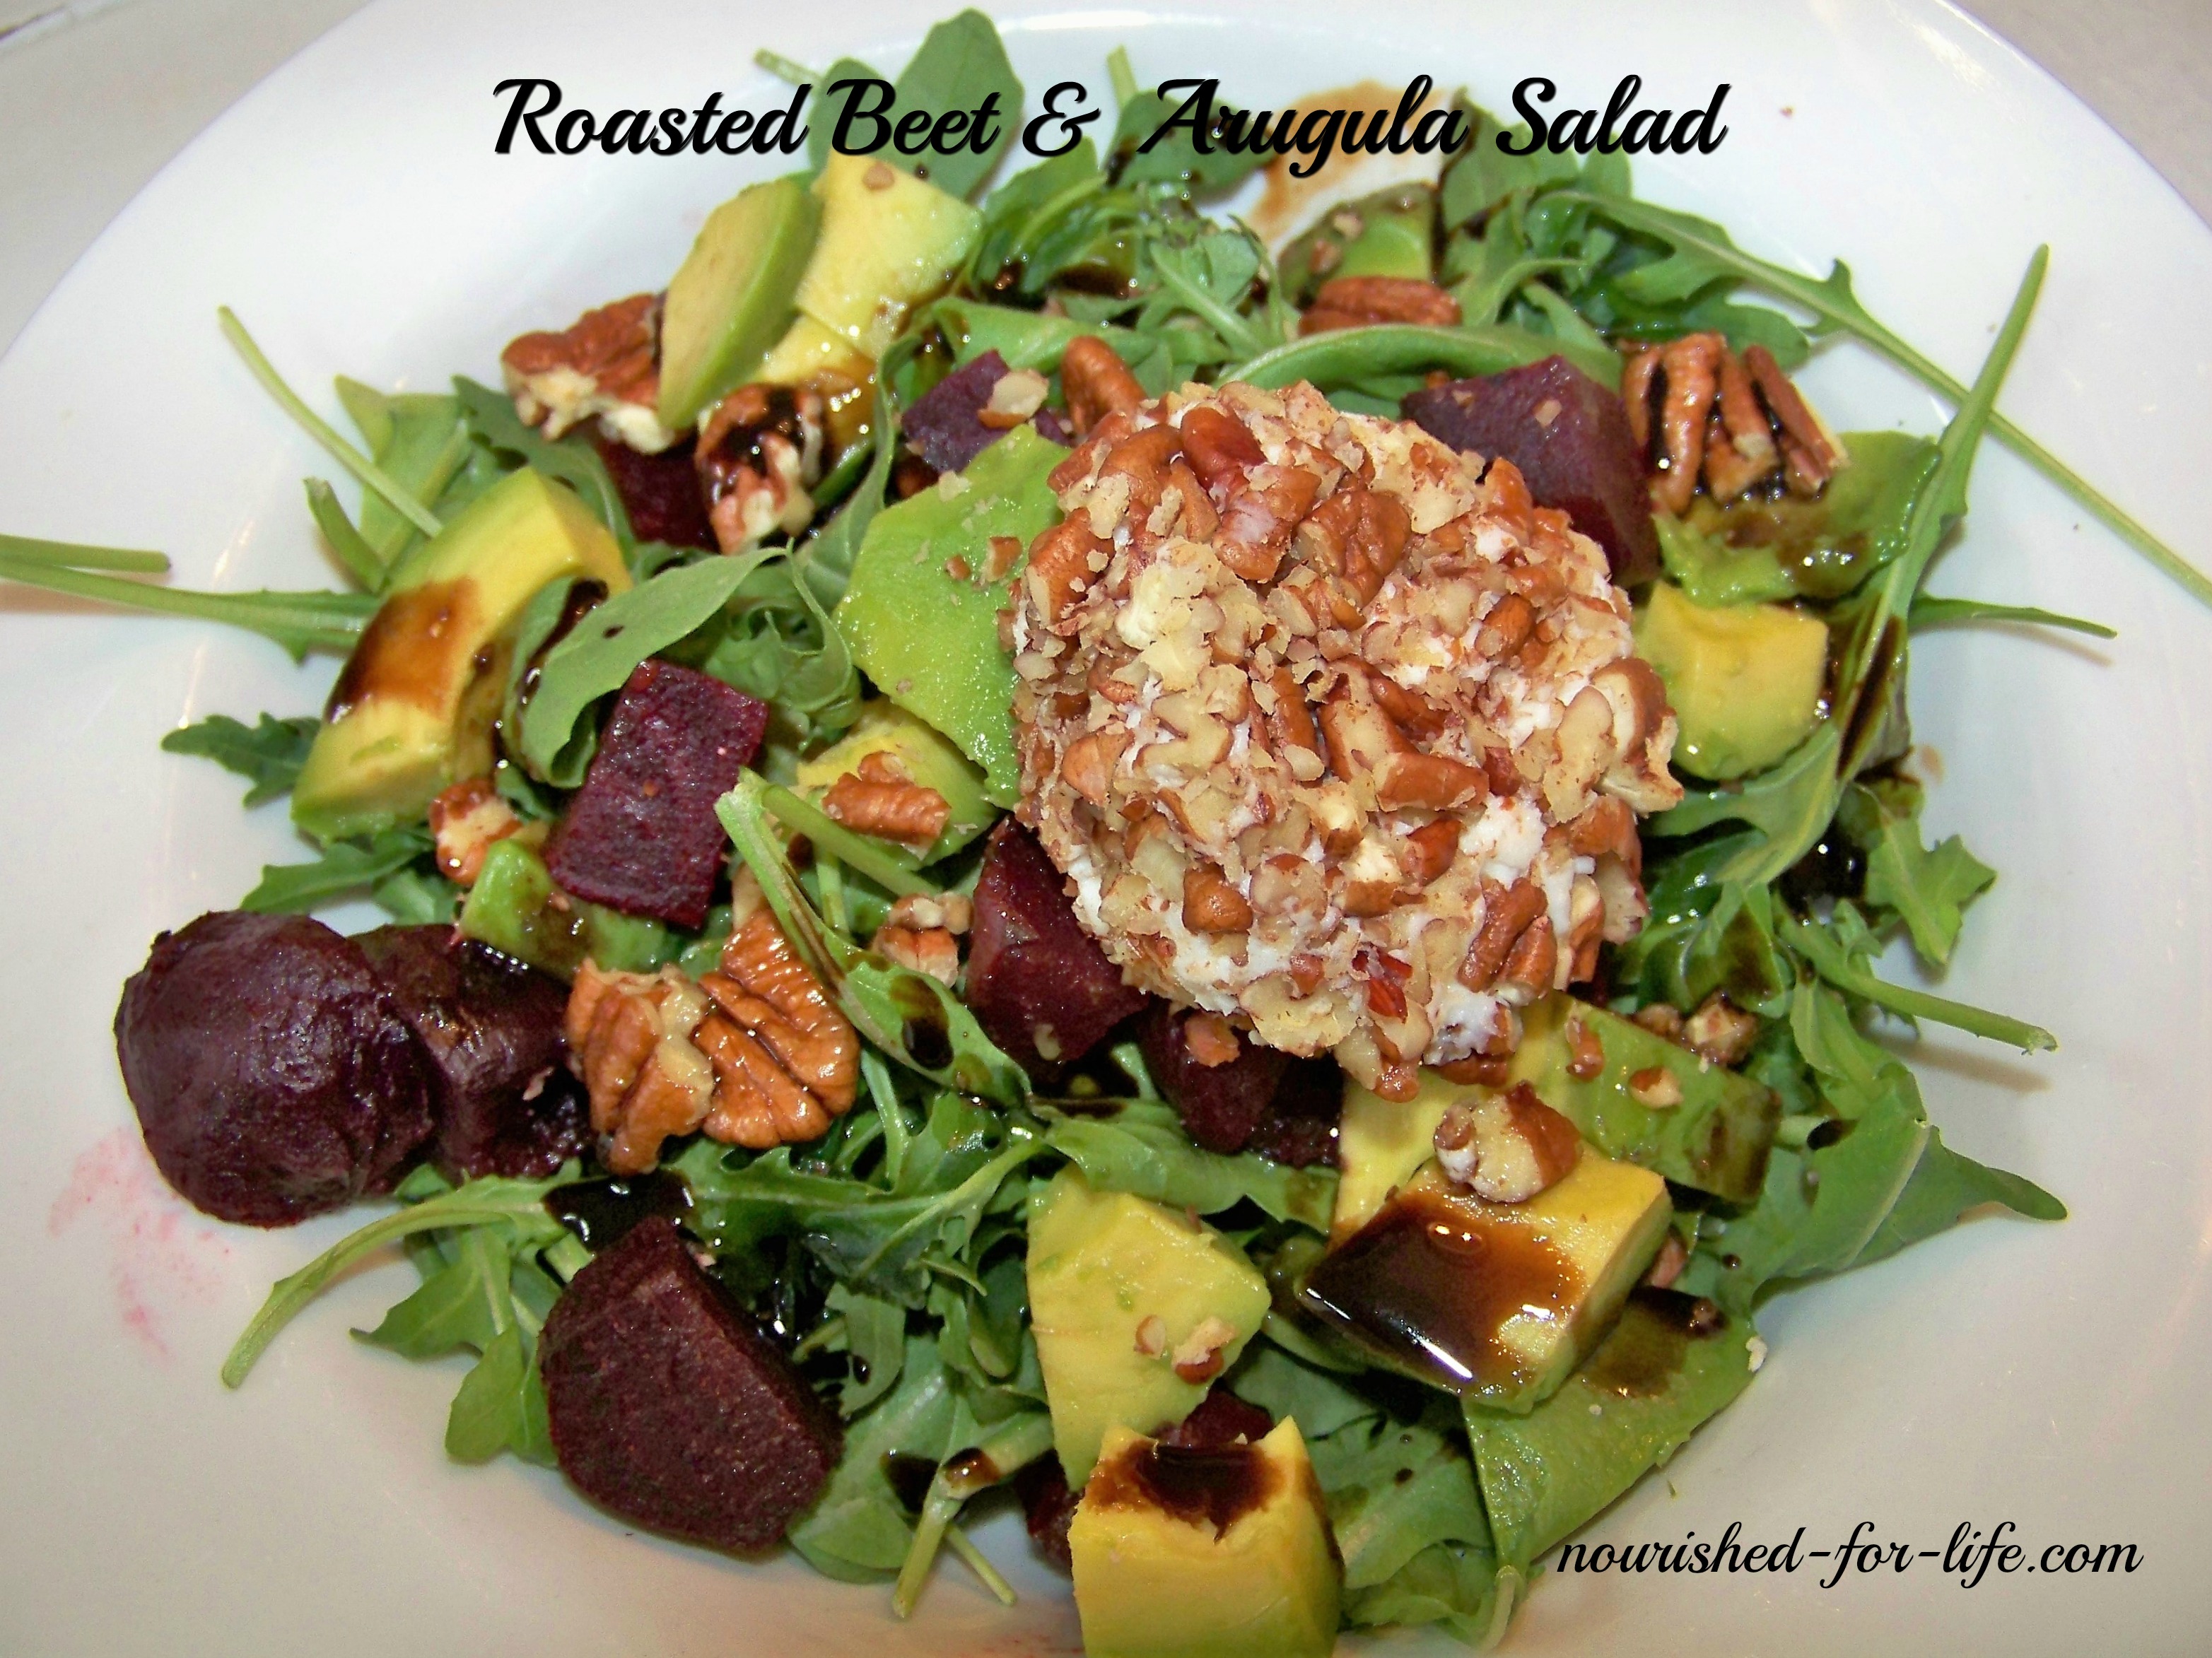
Heart Healthy Beet & Arugula Salad

Enjoy this amazingly delicious and health promoting salad as satisfying lunch or light dinner or as a start to a special meal!
Servings: 2 MAIN COURSE SERVINGS OR 4 SIDE SALADS
Calories: 220kcal

Ingredients

  • 2-3 cups Arugula (or mixed greens if you prefer) (or 5 oz.)
  • 1 bunch (2-3) roasted beets (Heat oven to 400. Cut off leafy tops, scrub beats & wrap in foil. Place in oven on a baking sheet to catch juices. Roast 40-50 min or until tender when pricked with a fork. Let cool then peel off the skins and dice. I roast a bunch at a time and then keep them for salads and smoothes all week)
  • 1 Avocado, diced (Cut in half, remove pit, slice through the avocado in hatch marks/squares in the peel and then use a spoon to scoop it out)
  • 1 roll Goat cheese
  • 1/2 c Pecans, finely chopped
  • Extra virgin olive oil

Balsamic Reduction

Instructions

  • Divide arugula between 2 plates for a main course or 4 plates for a starter or side salad portion.
  • Cut avocados in half around the pit, remove the pit and slice through the flesh of the avocado with a sharp knif. Use a spoon to scoop the slices out and divide evenly between the salads.
  • Slice or dice 2 beets and divide them between the salads. Add pecans and crumbled goat cheese, if using. Optionally, slice a log of soft goat cheese into 1/2 in thick slices and roll each slice in finely chopped pecans, pressing to get the pecans to adhere to the cheese. Place one slice of cheese on each salad.
  • Top your arugula or salad greens with the beets, avocado, and goat cheese rounds. Add more pecans if you like.
  • To make the balsamic reduction, pour the balsamic vinegar to a small saucepan and add the honey or coconut sugar. Bring to a gentle boil and simmer for 10-15 minutes until the balsamic is reduced by 1/3 to 1/2. The reduction will thicken a bit as it cools.
  • Drizzle each salad with extra virgin olive oil and the balsamic reduction and enjoy!
  • Enjoy!
    This makes one large main course serving or 2 side salads. Of course, adjust quantities to your taste.  

Sources for nutritional information:

http://www.medicalnewstoday.com/articles/282769.php

http://articles.mercola.com/sites/articles/archive/2014/01/25/beets-health-benefits.aspx

https://authoritynutrition.com/12-proven-benefits-of-avocado/

Eggplant Lasagna Stacks

My son LOVES eggplant and every year eagerly waits for it to be in season at the farm and start appearing at the farmers market. He loves Eggplant Parmesan, and I try to make my gluten and dairy free version for him once every season. But it is so time and labor intensive I don’t usually make it more than once. This year (after his Eggplant Parmesan) we are still enjoying an abundance of eggplant and he asked for eggplant lasagna. I couldn’t find a recipe I liked that met our dietary needs (half of us are gluten and dairy free) so I made up my own and it turned out to be a hit with the whole family.

eggplant-lasagna-stacks-collage

This sauce is one of our favorite tricks for dairy free cooking. Adding coconut milk or cream to tomato sauce makes it amazingly creamy and delicious and mimics the flavor you would get from ricotta cheese in a traditional lasagna or baked Italian dish.

I added the sausage because, well, my kids will eat just about anything with sausage in it. We use the Salt and Pepper ground pork sausage from Fischer Farms. With all meat, we focus on quality and enjoy it in moderation. Fisher Farms’ sausage is hormone and antibiotic free, from pastured pigs and completely nitrate and preservative free. And it adds amazing flavor. For me, its a good trade off for my kids enjoying eggplant, kale and all of the other goodness in this dish. If you prefer a vegetarian dish, just leave out the sausage and instead, add more kale and a few cloves of fresh chopped garlic to the caramelized onion and season generously with salt and pepper. It will still be delicious!

eggplant-lasagna-stacks

I still have fresh herbs growing in pots on my patio. I highly recommend growing your own herbs! It is so easy and such a huge help in making real food delicious, easy and affordable. Fresh herbs are too expensive in the grocery, don’t last long and I don’t always plan ahead enough to know what I’ll need. But I spend $10 to $20 on herbs in April or early May and I’m still picking from them now in early October. I love that I can just run outside and grab whatever I need, whenever I need it.

eggplant-lasagna-stacks2

I also used kale from my Tower Garden in this recipe. This is something else I cannot recommend highly enough! It makes it so easy to grow my own greens, herbs and other vegetables (all year around if you invest in grow lights!) and I can pick whatever I need, anytime. I pick kale or chard for my green smoothie almost every morning. You can’t get any easier, fresher or healthier than that!  You can learn more about the Tower Garden here, or if you are local and want to see mine you are welcome any time.

I’ve been experimenting with goat cheese for myself and my other dairy free family members. The proteins in goat cheese are much easier to digest than cow’s milk and much less inflammatory. So it is a good, more healthful alternative for some with dairy intolerance. Its totally optional here, but I sprinkled just a bit of goat cheese on half of our pan. We love it either way.

Find time to make these Eggplant Lasagna Stacks and enjoy with a big green salad!

And please comment below and let me know if you try it. I’d love to hear what you think!

Eggplant Lasagna Stacks (Gluten & Dairy Free, Paleo)

My take on eggplant lasagna is gluten and dairy free but so full of flavor and nutrition you won't miss the noodles or the cheese! (vegan/vegetarian option)    
Prep Time30 minutes
Cook Time30 minutes
Total Time1 hour

Ingredients

  • 1 c. full fat canned coconut milk
  • 1 25 oz jar pasta sauce 2-1/2 cups (I used Aldi's organic brand)
  • 3-4 medium sized fresh eggplant choose eggplant that are firm and smooth with bright shiny skin
  • 2-3 T Extra Virgin Olive Oil
  • Salt and pepper
  • 1 lb ground sausage
  • 1 onion diced
  • 5-6 kale leaves or spinach or chard
  • 20-25 Fresh basil leaves
  • Goat cheese optional

Instructions

  • Pre-heat oven to 375 degrees.
  • Trim the top stem end off of your eggplant and cut into 1/4" slices with a mandolin or sharp knife. (I recommend a good mandolin for this, as it makes it so much quicker and easier and ensures your slices are the same thickness. I have this OXO Mandolin and love it! You will need 44-48 slices. In my casserole dish, I can fit 11-12 "stacks" with 4 slices of eggplant in each stack.) Rub the eggplant slices with olive oil, lay them in a single layer on baking sheets and sprinkle with salt and pepper. Roast eggplant for about 5 minutes and then remove from oven.
  • While eggplant is roasting, combine coconut milk and pasta sauce in a small saucepan and warm it over low heat.
  • Combine onion and sausage in a skillet and cook over medium high heat until the sausage is browned and the onion is caramelized. While its cooking, chop the kale. Slice the leaves into thin ribbons and then cut up the ribbons into small bits. Add the kale to the sausage and onion mixture and stir until the kale is wilted. Remove from heat.
  • Spread a very thin layer (about 1/2 cup) of sauce in the bottom of a 9x13 pan or a comparable size casserole dish (I use a 2 qt. Pampered Chef stoneware casserole dish and can fit 11-12 stacks, depending on the size of my eggplants).
  • Choose 11-12 of the largest eggplant slices and lay them in a single layer in on top of the sauce. (You want to start with the largest slices and with each layer, use the next largest so that you end up with the smallest slices on top of your stacks.)
  • Divide the sausage mixture into four parts and use one quarter of the mixture for each layer. Place a spoonful of the sausage mixture in the center of each eggplant slice. Tear 5-6 basil leaves into pieces and sprinkle on top of the eggplant and sausage mixture. Pour 1/2 to 3/4 cup of sauce over each stack. The stacks will not be completely covered with sauce.
  • Repeat this layering two more times: Top each stack with another slice of eggplant (using the largest slices of eggplant first) then top with the sausage mixture, torn basil leaves and 1/2 c. of sauce. Reserve 5-6 basil leaves to add as a garnish, just before serving.
  • After the fourth and final layer of eggplant, spoon the remaining sauce over the stacks. Then top with the last portion of the sausage mixture, spooning some on top of each stack.
  • Top with crumbled goat cheese, if desired.
  • Cover the casserole dish with foil and bake at 375 for 30 minutes. Alternatively the dish can be refrigerated at this point and put back in the over before you're ready to serve.
  • Stack the remaining basil leaves and slice them into a thin julienne. When your Eggplant Lasagna Stacks are done, sprinkle them with fresh basil just before serving.
  • Enjoy!!

Notes

For a vegan/vegetarian option, simply omit the sausage and instead, to the caramelized onion add 12-15 leaves finely chopped kale, 3 cloves minced garlic and salt and pepper. Layer as instructed above.

Garlicky Roasted Sweet Potatoes

One of our favorite places is our local CSA, Seton Harvest, otherwise known as “the farm”. Of course we get amazing, locally grown, chemical free produce, usually harvested the day we pick it up. But its more than that. Going to the farm to pick up our weekly share, we get to escape our normal routine and stresses and breathe in the fresh country air; visit with friends; pet the dogs; feed the chickens; pick strawberries, fresh herbs, arugula, sungold tomatoes or whatever is in season and available for u-pick; hunt for caterpillars; chase butterflies; climb piles of mulch and make mazes out of bales of hale (yes that was us, sorry Joe and Julie!)

My big kids have practically grown up at the farm and it makes me so happy to see my youngest experiencing her first year running around the farm and loving it just as much as the rest of us do. Perhaps most of all, I LOVE that my kids know who grows their food and where it comes from (not just the supermarket!) and that they love things like eggplant and eagerly ask Farmer Joe when it will be in season and that they love to pick greens like arugula and sorrell and eat them on the drive home.

Garlicky Roasted Sweet Potatoes

One of our favorite places is our local CSA, Seton Harvest, otherwise known as “the farm”. Of course we get amazing, locally grown, chemical free produce, usually harvested the day we pick it up. But its more than that. Going to the farm to pick up our weekly share, we get to escape our normal routine and stresses and breathe in the fresh country air; visit with friends; pet the dogs; feed the chickens; pick strawberries, fresh herbs, arugula, sungold tomatoes or whatever is in season and available for u-pick; hunt for caterpillars; chase butterflies; climb piles of mulch and make mazes out of bales of hale (yes that was us, sorry Joe and Julie!)

My big kids have practically grown up at the farm and it makes me so happy to see my youngest experiencing her first year running around the farm and loving it just as much as the rest of us do. Perhaps most of all, I LOVE that my kids know who grows their food and where it comes from (not just the supermarket!) and that they love things like eggplant and eagerly ask Farmer Joe when it will be in season and that they love to pick greens like arugula and sorell and eat them on the drive home.

One of our favorite events at the farm is the annual sweet potato harvest, when we enjoy a beautiful fall evening of fellowship and digging sweet potatoes. Sadly, kid schedules haven’t allowed us to participate the last couple of years, so these pictures are a few years old, but we have been enjoying the labors of our fellow shareholders this week. When was the last time you dug up a sweet potato and then took it home and roasted it with fresh garlic (also fresh from the farm)? If you haven’t been so lucky, put it on your bucket list and find a time and place to experience this!

Even if you can’t harvest your own sweet potatoes, you can still make these sweet potatoes! This recipe is very loosely based on a recipe I found in Victoria magazine many years ago. I can’t tell you what issue or who the original author was but I do know it was a Thanksgiving recipe and it had crispy sage leaves on top. We’ve kept it simple, just sweet potatoes and fresh garlic, maybe a pinch of sea salt at the end if you think you need it. That’s it. And they are so good.

Garlicky Roasted Sweet Potatoes

Whether you need a new sweet potato recipe for your Thanksgiving dinner or just a nutrient dense side dish for the next time you grill  — these will hit the spot. In a pinch, you can make them without the marinating time, but that is truly the secret to this recipe. Skip it and you will have perfectly fine roasted sweet potatoes. Plan ahead a bit and you will be rewarded with amazingly delicious, crispy potatoes infused with garlicky goodness.

One quick equipment note:  I highly recommend a good mandoline for this recipe and any others involving sliced vegetables. It makes quick work of the sweet potatoes here, and ensures that they are all the same thickness so they cook evenly and at the same speed. I have this OXO Mandoline and love it!

Garlicky Roasted Sweet Potatoes

These sweet potatoes are marinated in garlic and extra virgin olive oil and roasted to crispy golden perfection. So simple and yet so delicious!
Prep Time2 hours 15 minutes
Cook Time30 minutes
Total Time2 hours 45 minutes

Ingredients

Instructions

  • Peel and slice the sweet potatoes into 1/4 inch thick slices. Use a mandoline to make this much easier and ensure your slices will be the same size and cook evenly.
  • Mince the garlic.
  • Put the sliced potatoes and garlic in a gallon size zip lock freezer bag. Add the olive oil. Zip the bag and then turn and massage the bag until the garlic and olive oil is distributed well. You want every slice of potato to be well coated, with some oil accumulating in the bottom of the bag. Lay the bag on one side and let it sit on the counter for at least 2 hours or in the refrigerator up to 24 hours. Turn the bag over a few times. This allows the olive oil to become infused with garlic flavor and gives the potatoes plenty of time to marinate in the garlic infused olive oil. The longer they marinate, the more flavor you will have.  
  • Preheat oven to 400 degrees. 
  • Remove the potato slices from the bag and lay evenly in a single layer on 2 or 3 baking sheets. The slices can overlap a bit, but you don't want to pile them up or the potatoes will steam, rather than roast, and will be mushy not crispy. 
  • Roast for about 30 minutes, rotating the pans from top to bottom of your oven part way through. At 20 minutes, start checking the potatoes. There is a very fine line between crispy potatoes and burnt potatoes. We like ours just this side of burnt. So it may seem a bit fussy, but I check them, remove any slices that are dark enough, and then put the pans back into the oven, checking every 2-3 minutes and repeating this procedure until they are all done perfectly. If you prefer not to fuss over your potatoes this much, just take them out when the first few are browned but not yet burned and the others are just beginning to turn golden brown around the edges or on the underside when you flip one over. They will be delicious either way! 

Maple Pecan Pumpkin Spice Muffins

Maple Pecan Pumpkin Spice Muffins

It’s fall!

I’m already seeing pumpkin everything, everywhere. So in honor of the first day of fall and one of my favorite times of year, I’m joining in the pumpkin love today.

You should absolutely jump on the pumpkin bandwagon this fall too. Not just because its delicious, but because pumpkin is packed full of nutrition. Pumpkin is very high in Vitamin A, one serving providing 245% RDA. It is also a good source of calcium, Vitamin C, several B vitamins (including folate) and a number of minerals including magnesium, potassium and phosphorus.

Maple Pecan Pumpkin Spice Muffins

These amazingly moist and flavorful muffins are the perfect way to satisfy your pumpkin spice cravings with health promoting ingredients and without any sugar or other harmful ingredients.

They are free of gluten, dairy, sugar and refined oils. They are paleo and vegetarian, and can easily be made vegan as well by substituting flax eggs. They are high in protein due to the almond butter, almond meal and eggs. Use eggs from pastured chickens for a healthy dose of omega -3s. And they freeze well too. I love to keep these in the freezer to pull out and pop in the oven for a quick healthy weekday breakfast.

Treat yourself to some delicious, healthful, pumpkin-y goodness!

Maple Pecan Pumpkin Spice Muffins (gluten & dairy free, paleo)

Ingredients

  • 1 very ripe banana mashed
  • 1 c.
  • Organic pumpkin purée
  • 3 eggs
  • 1 c.
  • Almond butter
  • 1/2 c.
  • Real maple syrup
  • 1 tsp.
  • Vanilla extract
  • 1 c.
  • Almond meal
  • 1 tsp.
  • Baking soda
  • 1 tsp. Unprocessed sea salt (I use
  • Celtic Sea Salt
  • or
  • Redmond Real Salt
  • )
  • 2 tsp. Ground cinnamon
  • 1 tsp. Ground ginger
  • 1/2 tsp. Ground nutmeg

Instructions

  • Preheat oven to 350 degrees and grease a muffin tin well with coconut oil or a bsking spray. If you prefer you can use paper or silicone muffin wrappers, but I really like these muffins with a bit of a crusty edge from baking directly in the pan.
  • Placed ripe, peeled banana in a mixing bowl and mash it with a fork.
  • Add the pumpkin purée and eggs and mix well. Add in the almond butter, maple syrup and vanilla, mixing until the batter is smooth and well combined.
  • Stir in the dry ingredients and spices and mix until combined.
  • Spoon into muffin tins,filling each cup about 3/4 of the way full. You should have 18 muffins. Bake 20-22 minutes. Cool for 10 to 15 minutes and then carefully remove the muffins from the pan and allow them to finish cooling on a wire cooling rack.
  • Enjoy your healthy pumpkin-y goodness!

Salted Caramel Almond Clusters

I love chocolate. I blame my mom (sorry, mom). And the days when she or one of my sisters or I would make a pan of brownies and my family would inhale the entire pan in record time. I am blessed to have a mom who loves to bake and our home always smelled of homemade bread, cookies and brownies.   

Now as a health coach and mom who works hard to feed my family nourishing foods that promote health, I still have absolutely no problem with a treat once in a while. But these days I try to choose my treats wisely. I try to choose treats that are delicious (never waste a treat on something mediocre!) and that completely satisfy my chocolate cravings or sweet tooth with healthful, real food ingredients and without harmful ingredients that sabotage our health like sugar, white flour, artificial flavors or colors, high fructose corn syrup, artificial sweeteners, trans fats, processed oils and chemical preservatives.

These Salted Caramel Almond Clusters fit the bill perfectly.

Salted Caramel Almond Clusters

My family all loves these salty sweet treats but lets be honest:

I make them for me.  

Salted caramel, almonds and chocolate. Three of my favorite things all in one delicious little bite.

And the best part?

It’s all real food with just a very small amount of sugar in the chocolate chips. So you can enjoy them completely guilt free. As long as you don’t eat 10 or 12 at once. But I have to warn you they are pretty addicting so that is not out of the realm of possibility.

Almonds contain lots of healthy fats, fiber, protein, magnesium and vitamin E. The health benefits of almonds include lower blood sugar levels, reduced blood pressure and lower cholesterol levels. You don’t need to fear the fat content of almonds, as they actually reduce hunger and promote weight loss.

Raw honey is a far healthier sweetener than processed white sugar. It doesn’t cause the same blood sugar spike or increase in insulin levels, and the glycemic effect is moderated even more when it’s paired with a healthy protein like in these little treats. According to Dr. Josh Axe, raw honey contains 22 amino acids, 27 minerals and 5,000 enzymes. Raw honey contains vitamins B6, thiamin, riboflavin, pantothenic acid and niacin. The bee pollen in raw honey helps improve immune function, fight infections and ward off seasonal allergies. Raw honey promotes antioxidant activity and a bit of raw honey at bedtime even improves sleep. You never want to heat raw honey as this destroys most of the health benefits.  

Dr. William Sears and Dr. Josh Axe both list dark chocolate as one of the top 10 highest antioxidant foods. Dark chocolate has an ORAC Score (Oxygen Radical Absorption Capacity) of 21,000, and Dr. Axe places it third on his list of highest antioxidant foods behind only Goji berries and wild blueberries. Hooray!! We can enjoy a small piece of dark chocolate or a few dark chocolate chips as a healthful treat every single day. Milk chocolate obviously has more sugar added and fewer health benefits, which means we need to eat it in moderation and as a once in a while treat.

If you love your chocolate like I do, its also important to choose the purest and best quality chocolate you can. I personally love Enjoy Life chocolate chips, chunks and baking chocolate. Enjoy Life products are free of gluten, dairy, soy, peanuts and fillers. Perfect for those of us with food allergies. But even if we suddenly didn’t have food allergies, this chocolate is so good I doubt I would ever be able to switch back to anything else!                

Salted Caramel Almond Clusters

These healthy little treats are amazing and satisfy your sweet tooth and chocolate cravings without any harmful ingredients! Enjoy completely guilt free!!
Prep Time10 minutes
Cook Time5 minutes
Total Time15 minutes
Servings: 36 Clusters
Author: Kristi Cirignano

Ingredients

  • 1/4 c raw honey
  • 1/4 c almond butter (make sure you use pure 100% almond butter with no sugar or other added ingredients. I prefer the fresh ground almond butter available locally at Fresh Market or at many natural grocery stores. I also sometimes order Kirkland Almond Butter from Amazon)
  • 1/2 tsp unprocessed sea salt
  • 1/2 tsp. vanilla extract
  • 1-1/2 c whole almonds (I usually use roasted and salted almonds from Aldi in this recipe, if you use raw or unsalted Almonds I would increase the sea salt to 1 tsp.)
  • 1/2 c Enjoy Life chocolate chips

Instructions

  • In a small bowl, stir together the honey, almond butter, sea salt and vanilla.
  • Add almonds and stir until they are all coated.
  • Line a baking sheet with parchment paper. Using two spoons, drop spoonfuls of the caramel almond mixture into the parchment paper. I usually get about 36 clusters.
  • Put your baking sheet in the freezer while you melt the chocolate for the topping. 
  • In a small saucepan over VERY low heat, slowly melt the chocolate chips until the chocolate is smooth and will spread easily. Stir often to prevent burning. If your heat is too high, your chocolate will become thick so its important to use very low heat and be patient. As soon as your chocolate is melted, remove it from the heat.
  • Use a spoon to spread a bit of the melted chocolate onto each cluster.
  • Return the baking sheet to the freezer for 1-2 hours to let the clusters harden. Store Salted Caramel Almond Clusters in the freezer until you are ready to enjoy, as they will get soft and gooey at room temperature. 
  • Try not to eat them all at once! 

Notes

This recipe is adapted from Elana's Pantry . I have probably made these a hundred times since I found Elana's delicious Macadamia Caramel Clusters and have tried a dozen variations and methods. This is by far my favorite and the only way I make these delicious little treats now! Thank you for the inspiration, Elana!


Sources:

draxe.com/the-many-health-benefits-of-raw-honey

https://authoritynutrition.com/9-proven-benefits-of-almonds/

Sears, W., & Sears, M. (2010). Prime-time health: A scientifically proven plan for feeling young and living longer. New York: Little, Brown and Co.

http://draxe.com/top-10-high-antioxidant-foods/

Healthy School Lunches in Ten Minutes a Day

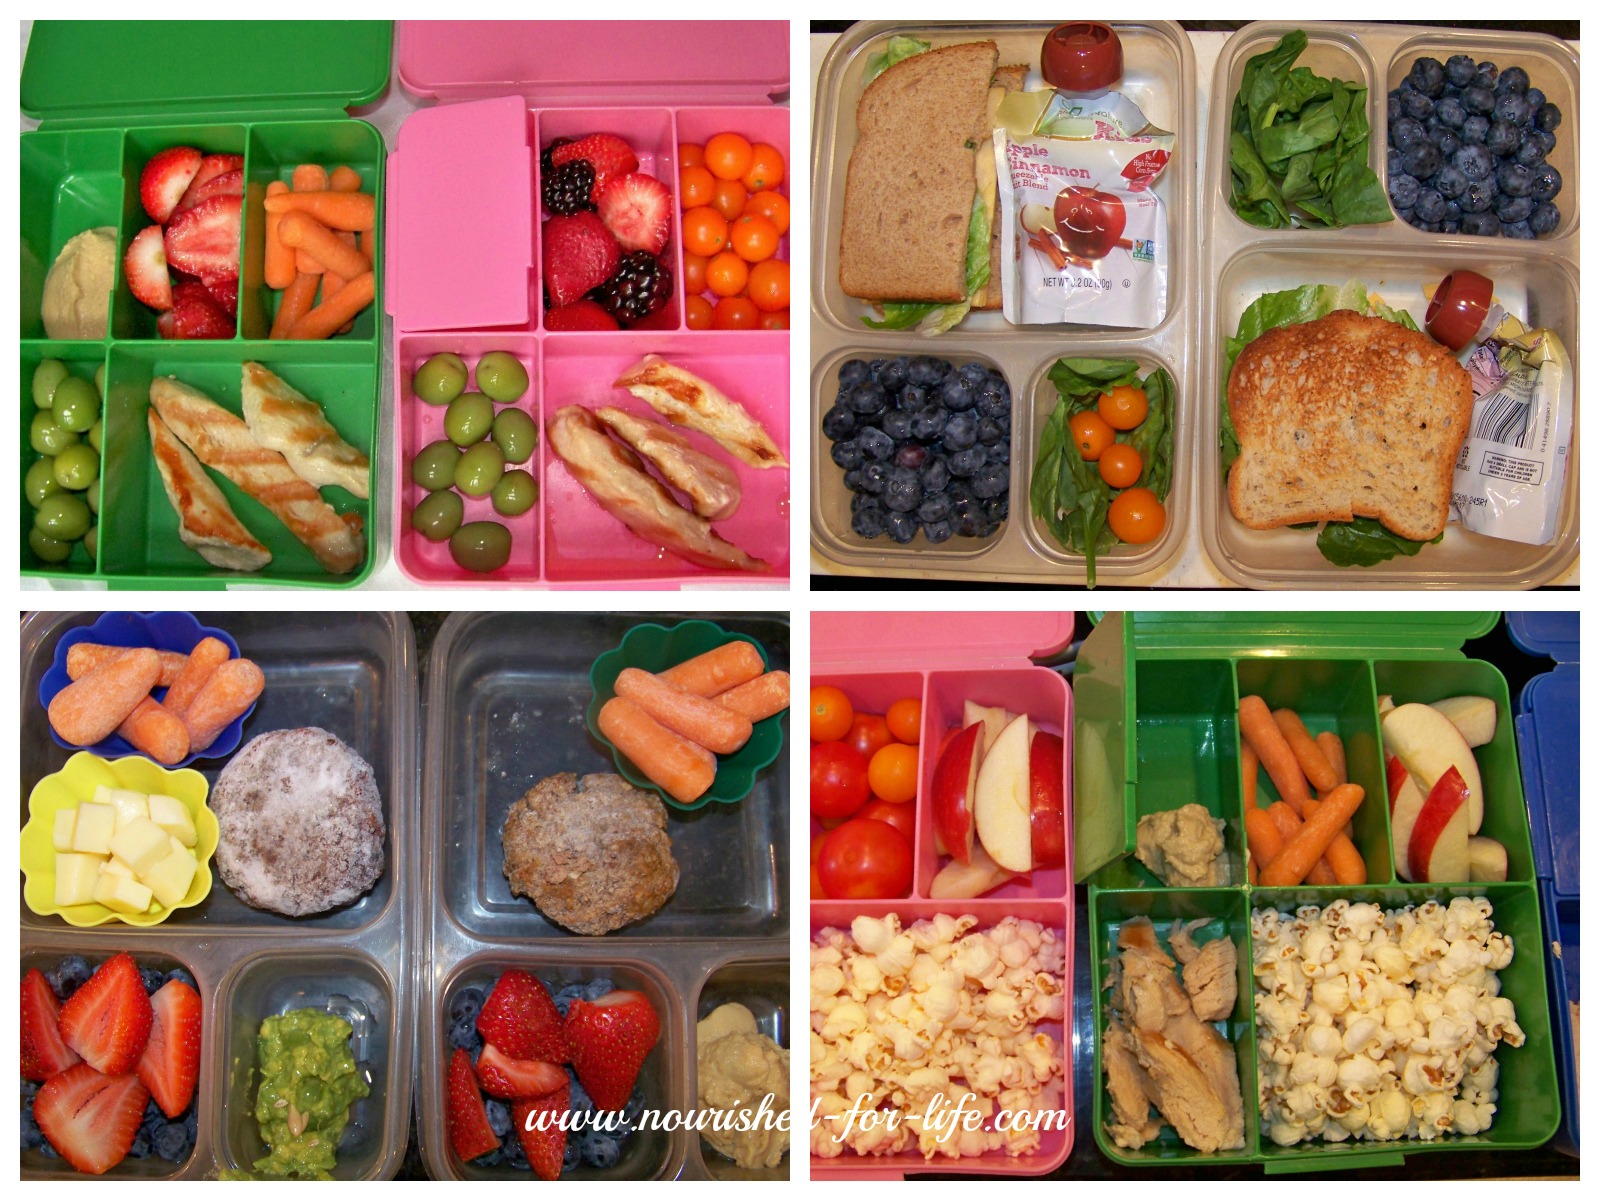
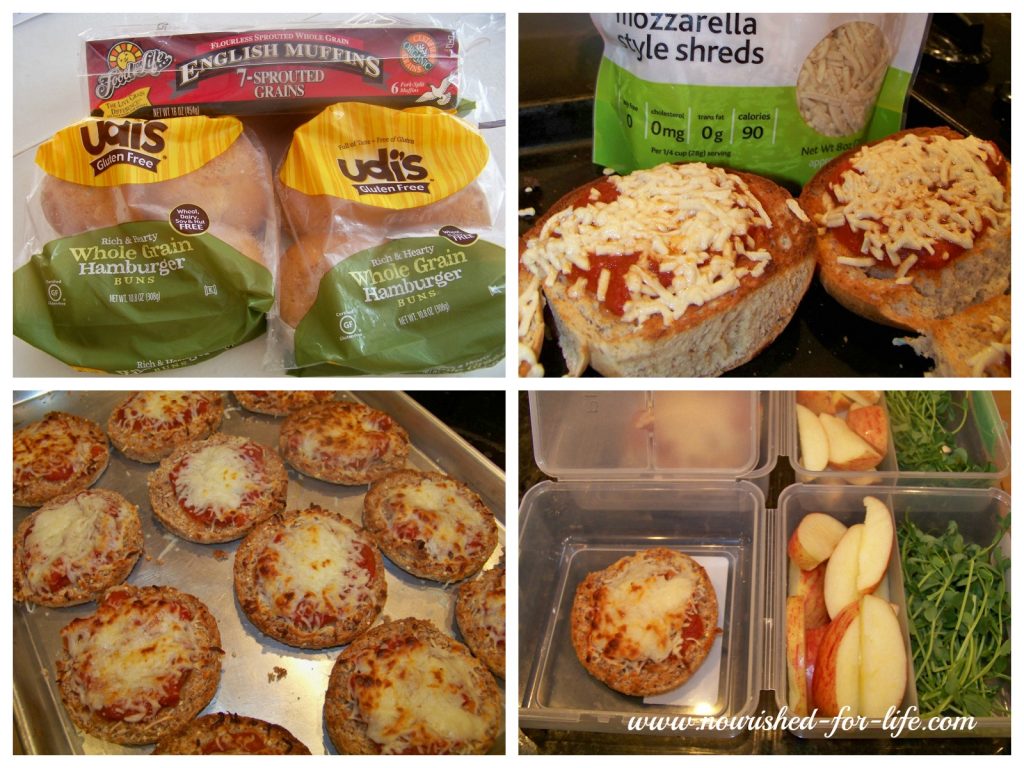
I recently read about a 2014 study that found home packed school lunches, as a whole, included more sugar, calories and unhealthy fats had lower nutritional value than school lunches. Wow! If this is true, we have some serious work to do, fellow lunch packing parents! I’ll admit packing school lunches is not my favorite activity. But it’s really important to me to feed my family foods that nourish their bodies and minds and we also have multiple food allergies, so its a necessity for us.

Our school lunches aren’t fancy, but they are filled with real whole foods that I feel good about feeding my kids. I’ve given you a quick reference list of the things on the rotation for my kids’ lunches. Read on below for my tips for getting this done quickly and easily. With a little planning ahead it really is possible to pack healthy, real food lunches in ten minutes a day!

I make most of our school lunches the night before. If I’m packing leftovers, I make lunches while I’m cleaning up from dinner so I only have to put food away once and I’m getting lunches packed at the same time. Then in the morning all I have to do is put the lunch containers in insulated lunch bags with a few ice packs. The biggest exception to this is soup–I heat it up and put it in thermoses in the morning while the kids are eating breakfast and it is still warm at lunch time.

I might have a bit of a problem with lunchbox containers. We have so many! But it helps keep the lunch packing process a bit more fun for me and I hope it keeps the kids from getting bored with their lunch options, too. We use the three compartment plastic EasyLunchBoxes and our Pottery Barn Kids bento boxes the most, but I also have several different Sistema containers. I really like their Lunch Cubes and Salad to Go containers and we use the Small Split for their morning snack.

Lunchbox collage

I generally follow the same basic formula: Main course (meat or another healthy protein/fat/whole grain), at least one fruit and at least one vegetable. Then I may add another side or two, depending on which lunch containers I’m using and whether I feel like they need more food.

I stock my freezer with things I can easily pull out and pop in a lunch container and they are thawed and ready to eat by lunchtime the next day.

  • When I make hamburgers, meatballs, or chicken for dinner I always make extra to freeze for lunches. I cut up chicken breasts into strips, grill them on a grill pan and freeze them for lunches. I always keep turkey meatballs and leftover hamburger patties in the freezer. My kids will happily eat any of these cold. I used to cut rounds of bread with a biscuit cutter and make cute little hamburger sliders with lettuce and cheese, but they prefer just the plain patty, which doesn’t seem quite as fun but I won’t complain because it makes my job easier. If possible, buy hormone and antibiotic free meat from grass fed/pastured animals. In addition to avoiding the hormones and antibiotics, pastured meat is much higher in omega-3 fatty acids and you get the benefit of the nutrition from all of the greens the animals eat. We buy our meat directly from Fischer Farms, a wonderful local family farm. I love knowing where my meat comes from and that it was raised humanely and healthfully.
  • Protein Muffins — I love to freeze these super healthy and delicious Grain Free Banana Protein Muffins from One Lovely Life for breakfasts and lunches. I make the recipe exactly as written except that I make 18 standard size muffins. These Flourless Chocolate Muffins were also on my list this week. Like the banana muffins, they are high in protein, have no flour, sugar or refined oils and they are so good.  You will never know they are made of chickpeas. My kids think they’re getting a chocolate cupcake in their lunches.
  • This week I also made and froze 24 Mini Pizzas. I use Food for Life sprouted grain hamburger buns or English muffins (for my gluten eaters) and for my gluten free kiddos either Food for Life gluten free English muffins or Udi’s whole grain gluten free hamburger buns. I lay the bun or muffin halves face up on a baking sheet and toast them in the oven, top with organic pasta sauce and cheese (or Diaya non-dairy cheese shreds for my dairy free kids), pop them back in the oven until the cheese melts, then let them cool and freeze them in a zip top bag. I’ll add a piece of fruit and a small salad or sprouts to their lunch and they will be set.

Healthy School Lunches

Other Main Courses — 

  1. Tacos — We have tacos for dinner several times a month and I always make extra so we can have tacos for lunches at least one day. I make 3 extra tacos before I clean up from dinner, put each one in a snack size zip top baggie so the toppings don’t fall out, and then put them in their lunch container with a piece of fruit and another side or two (sometimes a few organic blue corn chips and salsa or guacamole). The tacos are cold and I’m pretty sure the shells are soggy by lunch time but my kids still love them.
  2. Canned tuna — My daughter likes tuna plain straight from the can on a sandwich, on a salad or with whole grain crackers.
  3. Almond butter or sunbutter sandwiches are quick and easy.  Make sure you buy 100% pure, no sugar added Almond butter and use sprouted, whole grain or gluten free bread with the fewest and best ingredients possible.
  4. Lettuce and cheese sandwiches — I use Diaya cheddar style slices for my dairy free kiddos and put lettuce and cheese on sprouted wheat, whole grain or gluten free bread. My daughter likes a slice of tomato too. Once in a great while I give them BLTs.
  5. Chili or soup is good for variety in the fall and winter and makes a great, healthy lunch when paired with a real food muffin and a piece of fruit.
  6. Hard boiled eggs  — Make a dozen hard boiled eggs at a time and have enough for several days lunches. Buy local, organic or omega-3 eggs from pastured chickens, if possible.
  7. Organic yogurt — My preference is plain yogurt with just a bit of honey and some fruit or granola added, so I can control the amount of sugar.

Sides — Every lunch I pack has at least one vegetable and one fruit. I may add  a second fruit or one or two of the other options listed here:

  1. Veggies with hummus or guacamole for dipping— carrots, celery, bell peppers, broccoli, cauliflower, grape or cherry tomatoes, cucumber, or sugar snap peas, depending on which child and what they will eat.
  2. Lettuce or spinach salad — this is really just a few bites of salad, sometimes it gets eaten and sometimes it doesn’t!
  3. Pea, sunflower or radish sprouts — This is new for us this year. At our farmers market this summer we discovered Sprout Farms, a farmer who grows and sells micro greens and my kids love them! The amazing thing is that the sprouts really do taste just like the vegetable or seed they are grown from. The Pea Shoots really taste like peas and the Sunflower Shoots really taste like sunflower seeds. I’m thrilled to have another leafy green my crew will eat in their lunches. If you’re local, you can purchase them at the Downtown Evansville or Newburgh Farmer’s Markets or through their website. Or if you’re really ambitious you can grow sprouts in your own sprouting trays.
  4. Fresh Fruit — apple slices, berries, bananas, clementines and grapes are the most common lunchbox fruits for us
  5. Unsweetened applesauce — look for 100% applesauce with no added sugar (I’ve been known to pack apple slices and applesauce a few times when lunch supplies were very low.)
  6. Individual size fruit cups in 100% juice — I always have a few on hand for emergencies when we are out of fresh fruit
  7. Olives — My kiddos love olives and they are an easy and healthy fruit full of good healthy fats!  Our favorites are Castelvetrano Olives.
  8. Nuts and dates — I often fill one space in their bento boxes with nuts or a mix of dates and nuts for a healthy treat
  9. Cheese — buy organic where possible, local grass fed cheese is the best option if its available and fits your budget
  10. Protein muffins — see above for two of my favorites for my freezer stash
  11. Popcorn — a healthy whole grain treat as long as it isn’t popped in hydrogenated oils or loaded up with artificial flavoring
  12. Pretzels or whole grain or gluten free crackers — not really real food, but make it into my kids’ lunches once in a while
  13. Organic blue corn chips — also not really real food but I still use them once in a while on taco day

I hope this gives you some inspiration for your lunch boxes. It really is worth the effort to feed our kids real foods that nourish and heal their bodies and minds. I would love to hear if you have other real food lunch box ideas that your kids enjoy. Please share in the comments!

Matteo’s Buckwheat Pancakes

Five years ago when my son Matteo was diagnosed with intolerances to gluten, dairy and soy, I had a really steep learning curve. For the longest time we lived on clean meat, fruit, vegetables and rice while I tried to learn how to cook and bake with our limitations. In the end, we’ve adjusted quite well and our whole family is healthier for it. Aside from eating a lot more fruits and vegetables (did you know we should all eat at least 9 servings of fruits and vegetables a day?) we’ve learned to enjoy quinoa, buckwheat and a variety of nutrient dense grains, seeds and other whole foods.

Buckwheat isn’t actually wheat at all, or even a grain. It’s an incredibly nutrient dense fruit seed with over 80 vitamins, minerals and phytonutrients including manganese, copper, magnesium, phosphorus and folate. It is low glycemic and high in protein, fiber and antioxidants. Among its many health benefits, buckwheat has been found to help reduce inflammation and lower unhealthy LDL cholesterol, blood pressure and blood glucose levels. It’s a great alternative for those with celiac or gluten sensitivities and a good source of protein for vegetarians and vegans. But you should add buckwheat to your diet even if you aren’t vegetarian and don’t avoid gluten. Especially these pancakes.

Buckwheat Pancakes

These buckwheat pancakes were one of my first successful efforts in the world of gluten free baking so it seems fitting the recipe should be part of my first blog post. There was a time when Matteo would eat them two (or even three) times/day. They’re that good. Kid and in-law approved. The recipe is very forgiving and endlessly adaptable. If you’re used to white buttermilk style pancakes, try substituting unbleached all-purpose flour (or your favorite all-purpose gluten free blend) for one-third to one-half of the buckwheat flour and gradually increase the buckwheat as you acquire a taste for it.

Buckwheat Pancakes

Serve them with 100% real maple syrup (none of that fake artificially flavored corn syrup stuff please!!) And whatever you do, don’t skip the cinnamon and orange extract. Trust me on this one. Cinnamon has many healing properties, and cinnamon and orange are fantastic together and in combination with real maple syrup.

I’ve made several dozen batches of these pancakes in the last week to photograph. As I sorted through all of the too dark, too light or mis-shaped pancakes looking for the perfect ones I decided these aren’t picture perfect, food stylist pancakes.  They’re better. Thick, hearty, nutrient-dense, delicious, four-hungy-kids-waiting-impatiently-for-their-breakfast pancakes. No need for perfection. Your hungry family will love them just as much as mine does.

Buckwheat Pancakes

Matteo’s Buckwheat Pancakes

Ingredients

  • 6 oz. approx. 1-1/4 c. buckwheat flour
  • 2 oz. 1/2 c. ground flaxseed (flax meal)
  • 1 tsp. Baking powder
  • 1/2 tsp. Baking soda
  • 1 tsp. Sea salt
  • 1 tsp. Cinnamon
  • 2 eggs at room temperature* (or flax gel for vegan option, see note below)
  • 4 oz. 1/2 c. Melted coconut oil (applesauce also works well as a substitute in this recipe, it will just make your pancakes a bit cakier)
  • 1 tsp. Vanilla extract
  • 1 tsp. Orange extract
  • 8 fl.oz. 1 cup almond or coconut milk, at room temperature*
  • 1 Tbsp. Apple cider vinegar

Instructions

  • Mix milk and Apple cider vinegar and let it sit for a few minutes.
  • Whisk together dry ingredients. In a separate bowl or a large measuring cup, mix wet ingredients together. Then add to dry ingredients and stir until combined. These are fairly thick and hearty pancakes. If you like your pancakes thinner, feel free to add a bit more almond milk or water to the batter.
  • Lightly oil your pancake pan and warm it over medium-high heat. Cook pancakes 3-5 minutes per side, flipping to the second side when you start to see a few bubbles form.
  • Serve with 100% real maple syrup.