Eggplant Lasagna Stacks

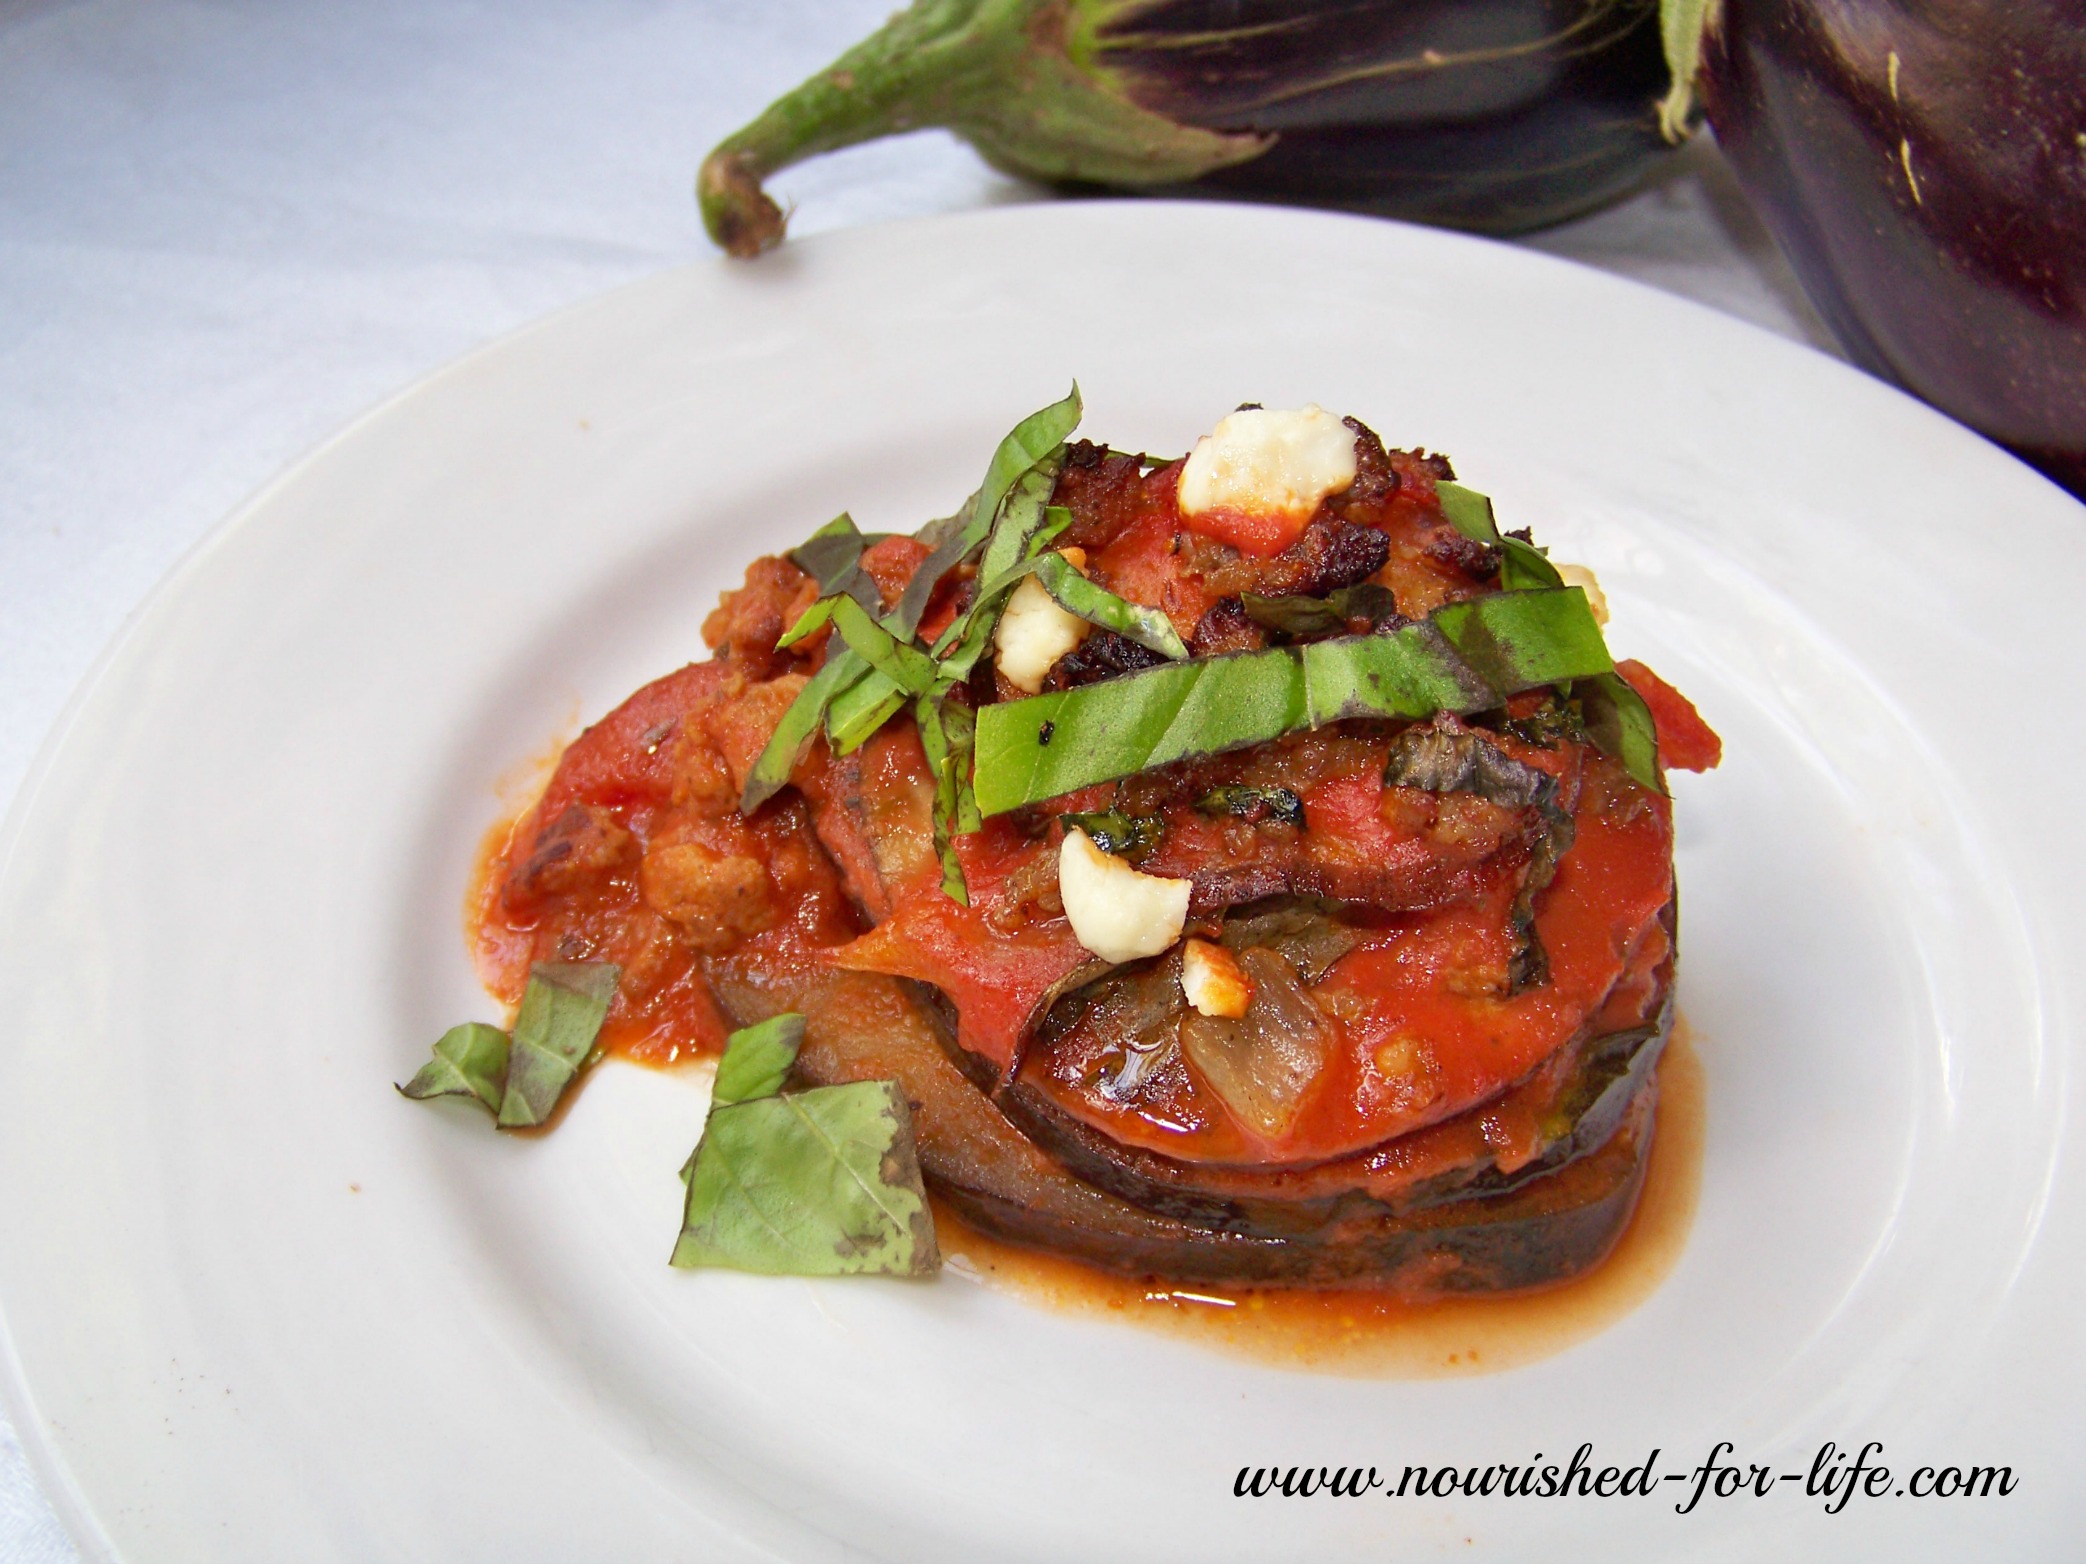
My son LOVES eggplant and every year eagerly waits for it to be in season at the farm and start appearing at the farmers market. He loves Eggplant Parmesan, and I try to make my gluten and dairy free version for him once every season. But it is so time and labor intensive I don’t usually make it more than once. This year (after his Eggplant Parmesan) we are still enjoying an abundance of eggplant and he asked for eggplant lasagna. I couldn’t find a recipe I liked that met our dietary needs (half of us are gluten and dairy free) so I made up my own and it turned out to be a hit with the whole family.

eggplant-lasagna-stacks-collage

This sauce is one of our favorite tricks for dairy free cooking. Adding coconut milk or cream to tomato sauce makes it amazingly creamy and delicious and mimics the flavor you would get from ricotta cheese in a traditional lasagna or baked Italian dish.

I added the sausage because, well, my kids will eat just about anything with sausage in it. We use the Salt and Pepper ground pork sausage from Fischer Farms. With all meat, we focus on quality and enjoy it in moderation. Fisher Farms’ sausage is hormone and antibiotic free, from pastured pigs and completely nitrate and preservative free. And it adds amazing flavor. For me, its a good trade off for my kids enjoying eggplant, kale and all of the other goodness in this dish. If you prefer a vegetarian dish, just leave out the sausage and instead, add more kale and a few cloves of fresh chopped garlic to the caramelized onion and season generously with salt and pepper. It will still be delicious!

eggplant-lasagna-stacks

I still have fresh herbs growing in pots on my patio. I highly recommend growing your own herbs! It is so easy and such a huge help in making real food delicious, easy and affordable. Fresh herbs are too expensive in the grocery, don’t last long and I don’t always plan ahead enough to know what I’ll need. But I spend $10 to $20 on herbs in April or early May and I’m still picking from them now in early October. I love that I can just run outside and grab whatever I need, whenever I need it.

eggplant-lasagna-stacks2

I also used kale from my Tower Garden in this recipe. This is something else I cannot recommend highly enough! It makes it so easy to grow my own greens, herbs and other vegetables (all year around if you invest in grow lights!) and I can pick whatever I need, anytime. I pick kale or chard for my green smoothie almost every morning. You can’t get any easier, fresher or healthier than that!  You can learn more about the Tower Garden here, or if you are local and want to see mine you are welcome any time.

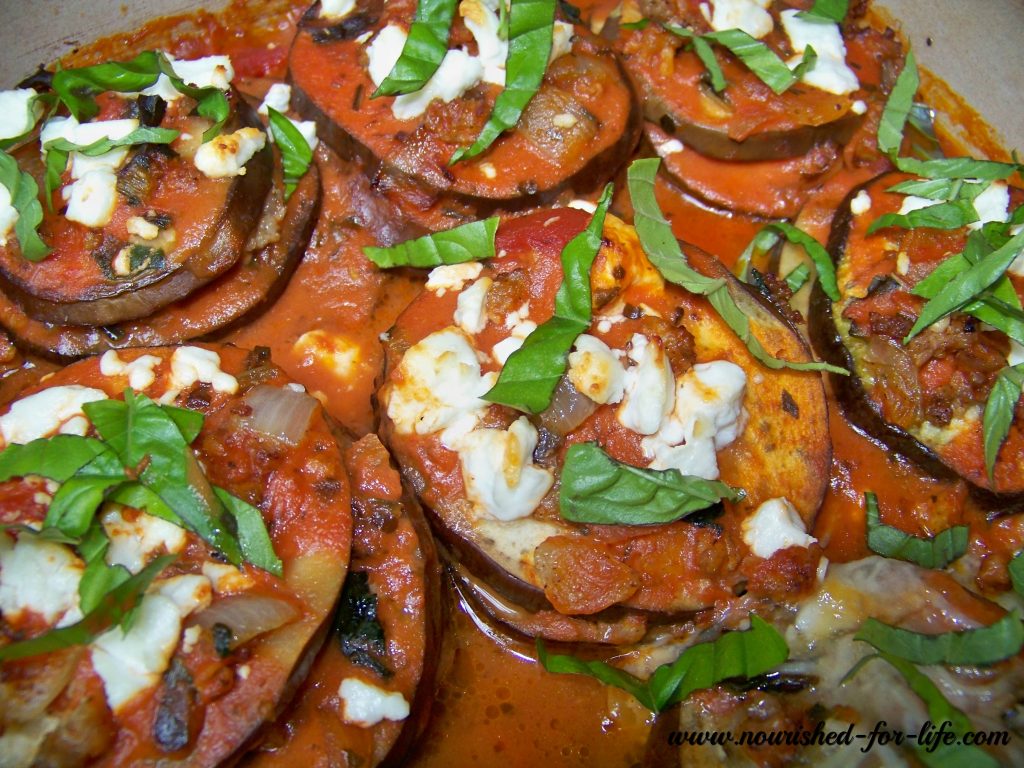
I’ve been experimenting with goat cheese for myself and my other dairy free family members. The proteins in goat cheese are much easier to digest than cow’s milk and much less inflammatory. So it is a good, more healthful alternative for some with dairy intolerance. Its totally optional here, but I sprinkled just a bit of goat cheese on half of our pan. We love it either way.

Find time to make these Eggplant Lasagna Stacks and enjoy with a big green salad!

And please comment below and let me know if you try it. I’d love to hear what you think!

Eggplant Lasagna Stacks (Gluten & Dairy Free, Paleo)

My take on eggplant lasagna is gluten and dairy free but so full of flavor and nutrition you won't miss the noodles or the cheese! (vegan/vegetarian option)    
Prep Time30 minutes
Cook Time30 minutes
Total Time1 hour

Ingredients

  • 1 c. full fat canned coconut milk
  • 1 25 oz jar pasta sauce 2-1/2 cups (I used Aldi's organic brand)
  • 3-4 medium sized fresh eggplant choose eggplant that are firm and smooth with bright shiny skin
  • 2-3 T Extra Virgin Olive Oil
  • Salt and pepper
  • 1 lb ground sausage
  • 1 onion diced
  • 5-6 kale leaves or spinach or chard
  • 20-25 Fresh basil leaves
  • Goat cheese optional

Instructions

  • Pre-heat oven to 375 degrees.
  • Trim the top stem end off of your eggplant and cut into 1/4" slices with a mandolin or sharp knife. (I recommend a good mandolin for this, as it makes it so much quicker and easier and ensures your slices are the same thickness. I have this OXO Mandolin and love it! You will need 44-48 slices. In my casserole dish, I can fit 11-12 "stacks" with 4 slices of eggplant in each stack.) Rub the eggplant slices with olive oil, lay them in a single layer on baking sheets and sprinkle with salt and pepper. Roast eggplant for about 5 minutes and then remove from oven.
  • While eggplant is roasting, combine coconut milk and pasta sauce in a small saucepan and warm it over low heat.
  • Combine onion and sausage in a skillet and cook over medium high heat until the sausage is browned and the onion is caramelized. While its cooking, chop the kale. Slice the leaves into thin ribbons and then cut up the ribbons into small bits. Add the kale to the sausage and onion mixture and stir until the kale is wilted. Remove from heat.
  • Spread a very thin layer (about 1/2 cup) of sauce in the bottom of a 9x13 pan or a comparable size casserole dish (I use a 2 qt. Pampered Chef stoneware casserole dish and can fit 11-12 stacks, depending on the size of my eggplants).
  • Choose 11-12 of the largest eggplant slices and lay them in a single layer in on top of the sauce. (You want to start with the largest slices and with each layer, use the next largest so that you end up with the smallest slices on top of your stacks.)
  • Divide the sausage mixture into four parts and use one quarter of the mixture for each layer. Place a spoonful of the sausage mixture in the center of each eggplant slice. Tear 5-6 basil leaves into pieces and sprinkle on top of the eggplant and sausage mixture. Pour 1/2 to 3/4 cup of sauce over each stack. The stacks will not be completely covered with sauce.
  • Repeat this layering two more times: Top each stack with another slice of eggplant (using the largest slices of eggplant first) then top with the sausage mixture, torn basil leaves and 1/2 c. of sauce. Reserve 5-6 basil leaves to add as a garnish, just before serving.
  • After the fourth and final layer of eggplant, spoon the remaining sauce over the stacks. Then top with the last portion of the sausage mixture, spooning some on top of each stack.
  • Top with crumbled goat cheese, if desired.
  • Cover the casserole dish with foil and bake at 375 for 30 minutes. Alternatively the dish can be refrigerated at this point and put back in the over before you're ready to serve.
  • Stack the remaining basil leaves and slice them into a thin julienne. When your Eggplant Lasagna Stacks are done, sprinkle them with fresh basil just before serving.
  • Enjoy!!

Notes

For a vegan/vegetarian option, simply omit the sausage and instead, to the caramelized onion add 12-15 leaves finely chopped kale, 3 cloves minced garlic and salt and pepper. Layer as instructed above.

Garlicky Roasted Sweet Potatoes

One of our favorite places is our local CSA, Seton Harvest, otherwise known as “the farm”. Of course we get amazing, locally grown, chemical free produce, usually harvested the day we pick it up. But its more than that. Going to the farm to pick up our weekly share, we get to escape our normal routine and stresses and breathe in the fresh country air; visit with friends; pet the dogs; feed the chickens; pick strawberries, fresh herbs, arugula, sungold tomatoes or whatever is in season and available for u-pick; hunt for caterpillars; chase butterflies; climb piles of mulch and make mazes out of bales of hale (yes that was us, sorry Joe and Julie!)

My big kids have practically grown up at the farm and it makes me so happy to see my youngest experiencing her first year running around the farm and loving it just as much as the rest of us do. Perhaps most of all, I LOVE that my kids know who grows their food and where it comes from (not just the supermarket!) and that they love things like eggplant and eagerly ask Farmer Joe when it will be in season and that they love to pick greens like arugula and sorrell and eat them on the drive home.

Garlicky Roasted Sweet Potatoes

One of our favorite places is our local CSA, Seton Harvest, otherwise known as “the farm”. Of course we get amazing, locally grown, chemical free produce, usually harvested the day we pick it up. But its more than that. Going to the farm to pick up our weekly share, we get to escape our normal routine and stresses and breathe in the fresh country air; visit with friends; pet the dogs; feed the chickens; pick strawberries, fresh herbs, arugula, sungold tomatoes or whatever is in season and available for u-pick; hunt for caterpillars; chase butterflies; climb piles of mulch and make mazes out of bales of hale (yes that was us, sorry Joe and Julie!)

My big kids have practically grown up at the farm and it makes me so happy to see my youngest experiencing her first year running around the farm and loving it just as much as the rest of us do. Perhaps most of all, I LOVE that my kids know who grows their food and where it comes from (not just the supermarket!) and that they love things like eggplant and eagerly ask Farmer Joe when it will be in season and that they love to pick greens like arugula and sorell and eat them on the drive home.

One of our favorite events at the farm is the annual sweet potato harvest, when we enjoy a beautiful fall evening of fellowship and digging sweet potatoes. Sadly, kid schedules haven’t allowed us to participate the last couple of years, so these pictures are a few years old, but we have been enjoying the labors of our fellow shareholders this week. When was the last time you dug up a sweet potato and then took it home and roasted it with fresh garlic (also fresh from the farm)? If you haven’t been so lucky, put it on your bucket list and find a time and place to experience this!

Even if you can’t harvest your own sweet potatoes, you can still make these sweet potatoes! This recipe is very loosely based on a recipe I found in Victoria magazine many years ago. I can’t tell you what issue or who the original author was but I do know it was a Thanksgiving recipe and it had crispy sage leaves on top. We’ve kept it simple, just sweet potatoes and fresh garlic, maybe a pinch of sea salt at the end if you think you need it. That’s it. And they are so good.

Garlicky Roasted Sweet Potatoes

Whether you need a new sweet potato recipe for your Thanksgiving dinner or just a nutrient dense side dish for the next time you grill  — these will hit the spot. In a pinch, you can make them without the marinating time, but that is truly the secret to this recipe. Skip it and you will have perfectly fine roasted sweet potatoes. Plan ahead a bit and you will be rewarded with amazingly delicious, crispy potatoes infused with garlicky goodness.

One quick equipment note:  I highly recommend a good mandoline for this recipe and any others involving sliced vegetables. It makes quick work of the sweet potatoes here, and ensures that they are all the same thickness so they cook evenly and at the same speed. I have this OXO Mandoline and love it!

Garlicky Roasted Sweet Potatoes

These sweet potatoes are marinated in garlic and extra virgin olive oil and roasted to crispy golden perfection. So simple and yet so delicious!
Prep Time2 hours 15 minutes
Cook Time30 minutes
Total Time2 hours 45 minutes

Ingredients

Instructions

  • Peel and slice the sweet potatoes into 1/4 inch thick slices. Use a mandoline to make this much easier and ensure your slices will be the same size and cook evenly.
  • Mince the garlic.
  • Put the sliced potatoes and garlic in a gallon size zip lock freezer bag. Add the olive oil. Zip the bag and then turn and massage the bag until the garlic and olive oil is distributed well. You want every slice of potato to be well coated, with some oil accumulating in the bottom of the bag. Lay the bag on one side and let it sit on the counter for at least 2 hours or in the refrigerator up to 24 hours. Turn the bag over a few times. This allows the olive oil to become infused with garlic flavor and gives the potatoes plenty of time to marinate in the garlic infused olive oil. The longer they marinate, the more flavor you will have.  
  • Preheat oven to 400 degrees. 
  • Remove the potato slices from the bag and lay evenly in a single layer on 2 or 3 baking sheets. The slices can overlap a bit, but you don't want to pile them up or the potatoes will steam, rather than roast, and will be mushy not crispy. 
  • Roast for about 30 minutes, rotating the pans from top to bottom of your oven part way through. At 20 minutes, start checking the potatoes. There is a very fine line between crispy potatoes and burnt potatoes. We like ours just this side of burnt. So it may seem a bit fussy, but I check them, remove any slices that are dark enough, and then put the pans back into the oven, checking every 2-3 minutes and repeating this procedure until they are all done perfectly. If you prefer not to fuss over your potatoes this much, just take them out when the first few are browned but not yet burned and the others are just beginning to turn golden brown around the edges or on the underside when you flip one over. They will be delicious either way! 

Salted Caramel Almond Clusters

I love chocolate. I blame my mom (sorry, mom). And the days when she or one of my sisters or I would make a pan of brownies and my family would inhale the entire pan in record time. I am blessed to have a mom who loves to bake and our home always smelled of homemade bread, cookies and brownies.   

Now as a health coach and mom who works hard to feed my family nourishing foods that promote health, I still have absolutely no problem with a treat once in a while. But these days I try to choose my treats wisely. I try to choose treats that are delicious (never waste a treat on something mediocre!) and that completely satisfy my chocolate cravings or sweet tooth with healthful, real food ingredients and without harmful ingredients that sabotage our health like sugar, white flour, artificial flavors or colors, high fructose corn syrup, artificial sweeteners, trans fats, processed oils and chemical preservatives.

These Salted Caramel Almond Clusters fit the bill perfectly.

Salted Caramel Almond Clusters

My family all loves these salty sweet treats but lets be honest:

I make them for me.  

Salted caramel, almonds and chocolate. Three of my favorite things all in one delicious little bite.

And the best part?

It’s all real food with just a very small amount of sugar in the chocolate chips. So you can enjoy them completely guilt free. As long as you don’t eat 10 or 12 at once. But I have to warn you they are pretty addicting so that is not out of the realm of possibility.

Almonds contain lots of healthy fats, fiber, protein, magnesium and vitamin E. The health benefits of almonds include lower blood sugar levels, reduced blood pressure and lower cholesterol levels. You don’t need to fear the fat content of almonds, as they actually reduce hunger and promote weight loss.

Raw honey is a far healthier sweetener than processed white sugar. It doesn’t cause the same blood sugar spike or increase in insulin levels, and the glycemic effect is moderated even more when it’s paired with a healthy protein like in these little treats. According to Dr. Josh Axe, raw honey contains 22 amino acids, 27 minerals and 5,000 enzymes. Raw honey contains vitamins B6, thiamin, riboflavin, pantothenic acid and niacin. The bee pollen in raw honey helps improve immune function, fight infections and ward off seasonal allergies. Raw honey promotes antioxidant activity and a bit of raw honey at bedtime even improves sleep. You never want to heat raw honey as this destroys most of the health benefits.  

Dr. William Sears and Dr. Josh Axe both list dark chocolate as one of the top 10 highest antioxidant foods. Dark chocolate has an ORAC Score (Oxygen Radical Absorption Capacity) of 21,000, and Dr. Axe places it third on his list of highest antioxidant foods behind only Goji berries and wild blueberries. Hooray!! We can enjoy a small piece of dark chocolate or a few dark chocolate chips as a healthful treat every single day. Milk chocolate obviously has more sugar added and fewer health benefits, which means we need to eat it in moderation and as a once in a while treat.

If you love your chocolate like I do, its also important to choose the purest and best quality chocolate you can. I personally love Enjoy Life chocolate chips, chunks and baking chocolate. Enjoy Life products are free of gluten, dairy, soy, peanuts and fillers. Perfect for those of us with food allergies. But even if we suddenly didn’t have food allergies, this chocolate is so good I doubt I would ever be able to switch back to anything else!                

Salted Caramel Almond Clusters

These healthy little treats are amazing and satisfy your sweet tooth and chocolate cravings without any harmful ingredients! Enjoy completely guilt free!!
Prep Time10 minutes
Cook Time5 minutes
Total Time15 minutes
Servings: 36 Clusters
Author: Kristi Cirignano

Ingredients

  • 1/4 c raw honey
  • 1/4 c almond butter (make sure you use pure 100% almond butter with no sugar or other added ingredients. I prefer the fresh ground almond butter available locally at Fresh Market or at many natural grocery stores. I also sometimes order Kirkland Almond Butter from Amazon)
  • 1/2 tsp unprocessed sea salt
  • 1/2 tsp. vanilla extract
  • 1-1/2 c whole almonds (I usually use roasted and salted almonds from Aldi in this recipe, if you use raw or unsalted Almonds I would increase the sea salt to 1 tsp.)
  • 1/2 c Enjoy Life chocolate chips

Instructions

  • In a small bowl, stir together the honey, almond butter, sea salt and vanilla.
  • Add almonds and stir until they are all coated.
  • Line a baking sheet with parchment paper. Using two spoons, drop spoonfuls of the caramel almond mixture into the parchment paper. I usually get about 36 clusters.
  • Put your baking sheet in the freezer while you melt the chocolate for the topping. 
  • In a small saucepan over VERY low heat, slowly melt the chocolate chips until the chocolate is smooth and will spread easily. Stir often to prevent burning. If your heat is too high, your chocolate will become thick so its important to use very low heat and be patient. As soon as your chocolate is melted, remove it from the heat.
  • Use a spoon to spread a bit of the melted chocolate onto each cluster.
  • Return the baking sheet to the freezer for 1-2 hours to let the clusters harden. Store Salted Caramel Almond Clusters in the freezer until you are ready to enjoy, as they will get soft and gooey at room temperature. 
  • Try not to eat them all at once! 

Notes

This recipe is adapted from Elana's Pantry . I have probably made these a hundred times since I found Elana's delicious Macadamia Caramel Clusters and have tried a dozen variations and methods. This is by far my favorite and the only way I make these delicious little treats now! Thank you for the inspiration, Elana!


Sources:

draxe.com/the-many-health-benefits-of-raw-honey

https://authoritynutrition.com/9-proven-benefits-of-almonds/

Sears, W., & Sears, M. (2010). Prime-time health: A scientifically proven plan for feeling young and living longer. New York: Little, Brown and Co.

http://draxe.com/top-10-high-antioxidant-foods/